Showing posts with label SharePoint 2010. Show all posts

Thursday, September 13, 2012

InfoPath Form Opens up in Client after site backup and restore

InfoPath Web Based Form Opens up in a Client after site collection backup and restore

Issue:

I encountered a small issue with InfoPath 2010 Form. I created a form and published to Form Library in SharePoint 2010. Its a browser based form and working fine with no issues at all.
We took a backup of site collection (where the form library exists) and restored to a new url.
Everything else was working fine except InfoPath form. This form does not open up in a browser infact opens up in an InfoPath client.

Resolution:

After bit of a research I was able to fix the problem.
  • In the new site collection, go to Site Collection Features.
  • Deactivate SharePoint Server Enterprise Site Collection features
  • Go to Site Features.
  • Deactivate SharePoint Server Enterprise Site features
  • Activate SharePoint Server Enterprise Site features
  • Go to Site Collection Features
  • Activate SharePoint Server Enterprise Site Collection features
Probably sequence does not matter but this is what I did and it worked for me.

Enjoy!

Wednesday, March 7, 2012

SharePoint 2010 Anonoymous Access and List Web Part with Custom XSLT

A SharePoint 2010 Site with Anonymous Access has a List Web Part or any web part that has custom XSLT applied, Anonymous user will get access denied. It will work fine for logged on user.

Solution:

I have a SharePoint 2010 public site and it has Anonymous Access enabled.
On the Landing page I added a List Web Part based on the custom list I created to store announcement information or Ads information. So its a "Landing Page Ads" list.

I added a Landing Page Ads list web part on the page, assigned the custom xslt url in the Miscellaneous section under XSL Link i.e. /Anything/Anything.xsl

After assigning the custom xsl link, this web part is supposed to display list items in a rotating fashion or like a carousel. It works find for the logged on user but for anonymous user it won't work, displays access denied message for that web part. Rest of the content/web parts on the page will display with no problem.

The solution which works in my case: I edited the landing page in SharePoint Designer.

After "< /datafields >" add these tags "< xsl >< /xsl >" and copy the code from Anything.xsl and paste it between "< xsl >< /xsl >"

Save the file and check your landing page with Anonymous access, it should work fine and should not display Access Denied error.

Thanks,

Thursday, February 23, 2012

SharePoint RegistrationID's

SharePoint Registration IDs reference to build Custom Actions

nvalidType = -1
GenericList = 100
DocumentLibrary = 101
Survey = 102
Links = 103
Announcements = 104
Contacts = 105
Events = 106
Tasks = 107
DiscussionBoard = 108
PictureLibrary = 109
DataSources = 110
WebTemplateCatalog = 111
UserInformation = 112
WebPartCatalog = 113
ListTemplateCatalog = 114
XMLForm = 115
MasterPageCatalog = 116
NoCodeWorkflows = 117
WorkflowProcess = 118
WebPageLibrary = 119
CustomGrid = 120
DataConnectionLibrary = 130
WorkflowHistory = 140
GanttTasks = 150
Meetings = 200
Agenda = 201
MeetingUser = 202
Decision = 204
MeetingObjective = 207
TextBox = 210
ThingsToBring = 211
HomePageLibrary = 212
Posts = 301
Comments = 302
Categories = 303
Pages = 850
IssueTracking = 1100
AdminTasks = 1200


Reference blog http://sharepointsolution2010.blogspot.com/2011/09/registration-ids-sharepoint.html

Thanks to Nandini

Monday, October 4, 2010

Implement Cascading Dropdown in SharePoint 2010 List

Implement Cascading Dropdown in SharePoint 2010 List.

To implement cascading dropdown in SharePoint list you dont need to write custom code or do customization in SharePoint Designer. All you need to do is follow below mentioned steps.Its easy!!

I will create 3 lists. Countries, Cities and CountryCity (carries cascading dropdown)

1) Countries List

Create a custom list called Countries and add some name of the countries in the list. No custom columns created. As shown in the image.


2) Cities List

Create another custom list called Cities. Add custom lookup column called Country as shown below.


Now add some items in the Cities list corresponding to the Countries mentioned in the dropdown.


3) CountryCity List

Create a custom list called CountryCity. Create two custom look up columns Country and City. I described above how to create custom column so I am not describing it again.

Cascading dropdown functionality
========================
  • Go to CountryCity List Settings then Advanced Settings. Select No in the last option 'Launch forms in a dialog'.
  • download spcd.js here
  • Upload spcd.js file in any document library on the site. This javascript file will be used to implement cascading functionality.
  • Click on 'Add new item' in the CountryCity list .
  • In this NewForm.aspx page go to 'Site Actions' then 'Edit Page'
  • Add HTML Form Web Part then 'Edit Web Part'
  • In the Source Editor, add the following code. You can download the below code from here

  • Make sure you specify the correct path of .js file (you uploaded in the doc lib) in the src attribute.
  • This is the syntax of calling the js function

var ccd1 = new cascadeDropdowns(ParentDropDownTitle, ChildDropDownTitle, Child2ParentFieldIntName, ChildListNameOrGuid, ChildLookupTargetField)

  • Hit Ok on the web part properties and stop editing NewForm.aspx page.
  • Try to add new item, Country and City dropdowns should work as cascading dropdowns.


  • You have to follow the same steps for EditForm.aspx as well.

If you have a problem implementing it, just drop a comment. It works fine in SharePoint 2007 and SharePoint 2010 both.

Thanks,

JK

Sunday, October 3, 2010

SharePoint 2010 - Disable New Folder Button in a Document Library

How to disable 'New Folder' button in Document Libraries of a site in SharePoint 2010?

There might be a requirement from business to disable 'New Folder' button on a ribbon in all document libraries of a site.
You can achieve this task by going to each and every document library Advanced settings and
chose "No" for "Make 'New Folder' command available? "
Lets say, if you have 50 document libraries in a site and you want to disable New Folder option, how long its gonna take to make that change Or even if you do that manually, how will you make sure if any new Document Library created in a site will have New Folder option disabled?
In order to cater this requirement, the simple way is to create afeature, install it and then enable it on that site where you want to disable New Folder button in lthe document libraries.

Solution:

1) Create a Feature

  • Create a folder in your file system with a name of DisableNewFolderButton.

  • Create two files in this folder, feature.xml and Manifest.xml

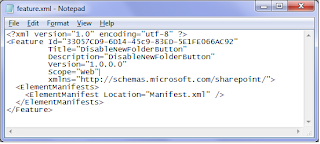
  • Edit feature.xml file in notepad and add the following code


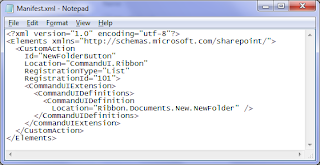
  • Edit Manifest.xml file in notepad and add the following code.


DisableNewFolderButton Feature has been created.


2) Install a Feature

  • We need to install this feature in SharePoint 2010.
  • Copy the folder DisableNewFolderButton to SharePoint 14 hive feature folder. (C:\Program Files\Common Files\Microsoft Shared\Web Server Extensions\14\TEMPLATE\FEATURES\).
  • Open stsadm tool as Administrator and exceute the following command. stsadm -o installfeature -name DisableNewFolderButton. Feature will be installed after running this command.

3) Activate a Feature

  • Feature has been installed now we want to activate the feature on a site.
  • Open stsadm tool as Administrator and exceute the following command. stsadm -o activatefeature -name DisableNewFolderButton -Url http://yoursiteurl/

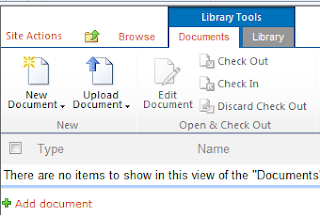
Now you go to the document library in the site, you will see New Folder is not visible as shown in the image.


If you want to make New Folder visible for a particular site, go to Site Actions --> Site Settings --> Manage Site Features. You can see your feature Active as show in the image.


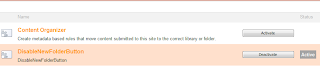
Deactive the feature, New Folder will be visible in the document libraries of that site.

Thanks,

JK

Tuesday, June 15, 2010

Save Site As Template in SharePoint 2010

How to Save Site As Template in SharePoint 2010?

Sometimes you need to create multiple sites that would have same contents or atleast all of the sites have some common web parts, libraries, lists and contents. So instead of creating every site from the scratch, you can create site template then create sites based on that template. This approach would save time and make sure you have consistency across the board.

If you go to Site Actions then Site Settings, you don't find the Save Site As Template option. Atleast I didn't find it anywhere.
If you dont find the option of Save Site As Template, then go to the URL as shown below in the image. type http://yoursite/_layouts/savetmpl.aspx. Enter the complete URL of the site you want to create a template of then append /_layouts/savetmpl.aspx to it. The .aspx page will be opened as shown below.

1) Type the Filename and Template name. Tick the box 'Include Content' if you want to have content included from the source site.


2) You can see your site template name in the Solution Gallery.


3) Since the site template has been created, you go to Site Actions --> New Site
Click on Blank & Custom section on the left navigation. On the main section you will find your site template that you created in previous step. Select the site template then click Create.
You site will be created successfully.


Thanks!

Enjoy :-)

Monday, May 10, 2010

Imtech Content Query Web Part Paging - on bottom right side.

How to display Paging Control in Imtech CQWP - Display on the bottom right side?

I wanted to implement paging on a Content Query Web Part. I came across Imtech Content Query Web Part which provides paging functionality. The issue with this web part is that it shows paging control at the top left corner and the docs are displayed below. My requirement was to display paging control on the bottom right side and docs should be displayed above the paging control.
In order to achieve this, I had to customize style sheets provided by Imtech CQWP web part.

1. Open SharePoint Designer 2010, then click on All Files --> Style Library -->XSL Style Sheets
2. Open the ImtechItemStyle.xsl file and select the code highlighted in the below image and cut (CTRL X) it.


3. Open the ImtechContentQueryMain.xsl file and paste the code before end of ForEach loop as shown in the image below.


4. Save both the files ImtechContentQueryMain.xsl and ImtechItemStyle.xsl. Add Imtech Content Query Web Part on the page. Point these style sheets in the web part properties. You will see the paging control on the bottom right corner of the control.

Sunday, April 11, 2010

BDC Service in SharePoint 2010

How to create Business Data Connectivity Service Application ?

BCS in SharePoint 2010 is all about connecting with external data. You can leverage SharePoint 2010 BCS component and manipulate with your external data with just a few clicks. In order to use external data in SharePoint 2010 you should have BDC Service up and running.

* Go to SharePoint Central Admin

* Click on 'Manage Service Application' under Application Management heading.


* On Ribbon, click on New dropdown then click on Business Data Connectivity.


* A pop up will be opened where you fill out the necessary information then click OK.

* If there is no problem connecting with DB or Service Account, a message will be displayed "BDC Service Application has been created successfully".

* When the service applications are created they are not started by default. You have to Start the Business Data Connectivity Service manually.

* Go to Central Admin and click on 'Manage Services on Server' under System Settings heading.


* Click on Start against Business Data Connectivity Service.


That's It!!!

Saturday, April 10, 2010

Branding in SharePoint 2010 - CSS Classes

I was working on a project where I happened to implement Branding on SharePoint site. I created/modified the existing CSS Classes to achieve the desired result.
Here are some CSS classes listed below that I modified:

To hide Quick Launch

.ms-quicklaunchouter
{
display:none;
}
#s4-leftpanel-content
{
display:none;
}
.s4-ca
{
MIN-HEIGHT: 324px; BACKGROUND: #fff; MARGIN-LEFT: 0px; MARGIN-RIGHT: 0px
}

Change global navigation background color

.s4-tn
{
background:white;
}

Change the font color of the site actions text

.ms-menu-a span
{
color:black;
}

To hide title logo - breadcrumb

.s4-titlelogo
{
display:none;
}

Make breadcrumb bar height small
.s4-title, .s4-lp
{
background:white;
}

To hide breadcrumb tag & Notes section - breadcrumb

.ms-socialNotif
{
display:none;
}

Change the font color of Browse and Page text in the menu
.ms-cui-tt-span
{
color:black;
background:white;
}


Change the background color of top bar (site actions, browse, page)

.ms-cui-topBar2
{
background:white;
}

Make all menu item color black

.s4-tn li.static > .menu-item
{
color:black;
border-color:black;
}

Menu item background color

.s4-tn li.static a.menu-item
{
background:white;
}

Global navigatioh selected item color red i.e. first tab

.s4-toplinks .s4-tn a.selected
{
color:red;
border-color:black;
}

Global navigation menu item hover - black

.s4-toplinks .s4-tn a.selected:hover
{
color:black;
}

Menu item hover

.s4-tn li.static > a:hover
{
background:white;
border-color:black;
border:thin;
color:red;
}

Change the Action Button background color -Logged on Username

.ms-SpLinkButtonActive a,.ms-SpLinkButtonActive a:hover{
color:red;
text-decoration:none;
background:FFDBAD;
}

Change the background color of the web part header where the Title is 'Working at ABC'

.ms-WPHeader TD[title^="Working at ABC"]
{
background:#FF9900;
}

Change the font color of logged on username

.ms-SPLink A:link,.ms-SPLink A:visited
{
color:gray;
text-decoration:none;
font-size:14px;
font-weight:bold;
text-decoration:underline;
}

SharePoint 2010 Developer Dashboard

How to Set On/Off Developer Dashboard in SharePoint 2010

Open "SharePoint 2010 Management Shell".

Go to Start > All Programs >> Microsoft SharePoint 2010 Products >> SharePoint 2010 Management Shell

Run As Administrator
Make sure you run "SharePoint 2010 Management Shell" as an Administrator. You wont be able to perform this operation otherwise. Right click on "SharePoint 2010 Management Shell" select "Run As Administrator"

Turn On Developer Dashboard
------------------------------------------------
Stsadm -o setproperty -pn developer-dashboard -pv on

Turn Off Developer Dashboard
------------------------------------------------
Stsadm -o setproperty -pn developer-dashboard -pv off


Enjoy :-)

Wednesday, March 24, 2010

Backup SharePoint 2010 Site, Backup-SPSite

To create a backup of your SharePoint 2010 site collection:

* Go to Start > Programs > Microsoft SharePoint 2010 Products > SharePoint 2010 Management Shell.


* Type this command on the prompt.

Backup-SPSite -Identity http://sitecollectioname/ -Path "C:\BackupFolder\BackupFilename.bak" -NoSiteLock -SqlSnapshot -Verbose


* Change the name of the SiteCollection as per yours. And also change the name of the Backup Folder and Backup Filename as you like.


* MSDN reference.

Thanks,

JK