Monday, October 4, 2010

Implement Cascading Dropdown in SharePoint 2010 List

Implement Cascading Dropdown in SharePoint 2010 List.

To implement cascading dropdown in SharePoint list you dont need to write custom code or do customization in SharePoint Designer. All you need to do is follow below mentioned steps.Its easy!!

I will create 3 lists. Countries, Cities and CountryCity (carries cascading dropdown)

1) Countries List

Create a custom list called Countries and add some name of the countries in the list. No custom columns created. As shown in the image.



2) Cities List

Create another custom list called Cities. Add custom lookup column called Country as shown below.


Now add some items in the Cities list corresponding to the Countries mentioned in the dropdown.
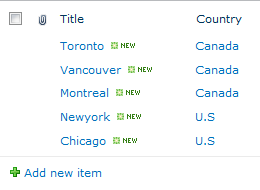


3) CountryCity List

Create a custom list called CountryCity. Create two custom look up columns Country and City. I described above how to create custom column so I am not describing it again.

Cascading dropdown functionality
========================
  • Go to CountryCity List Settings then Advanced Settings. Select No in the last option 'Launch forms in a dialog'.
  • download spcd.js here
  • Upload spcd.js file in any document library on the site. This javascript file will be used to implement cascading functionality.
  • Click on 'Add new item' in the CountryCity list .
  • In this NewForm.aspx page go to 'Site Actions' then 'Edit Page'
  • Add HTML Form Web Part then 'Edit Web Part'
  • In the Source Editor, add the following code. You can download the below code from here

  • Make sure you specify the correct path of .js file (you uploaded in the doc lib) in the src attribute.
  • This is the syntax of calling the js function

var ccd1 = new cascadeDropdowns(ParentDropDownTitle, ChildDropDownTitle, Child2ParentFieldIntName, ChildListNameOrGuid, ChildLookupTargetField)

  • Hit Ok on the web part properties and stop editing NewForm.aspx page.
  • Try to add new item, Country and City dropdowns should work as cascading dropdowns.


  • You have to follow the same steps for EditForm.aspx as well.

If you have a problem implementing it, just drop a comment. It works fine in SharePoint 2007 and SharePoint 2010 both.

Thanks,

JK

Sunday, October 3, 2010

SharePoint 2010 - Disable New Folder Button in a Document Library

How to disable 'New Folder' button in Document Libraries of a site in SharePoint 2010?

There might be a requirement from business to disable 'New Folder' button on a ribbon in all document libraries of a site.
You can achieve this task by going to each and every document library Advanced settings and
chose "No" for "Make 'New Folder' command available? "
Lets say, if you have 50 document libraries in a site and you want to disable New Folder option, how long its gonna take to make that change Or even if you do that manually, how will you make sure if any new Document Library created in a site will have New Folder option disabled?
In order to cater this requirement, the simple way is to create afeature, install it and then enable it on that site where you want to disable New Folder button in lthe document libraries.

Solution:

1) Create a Feature

  • Create a folder in your file system with a name of DisableNewFolderButton.

  • Create two files in this folder, feature.xml and Manifest.xml

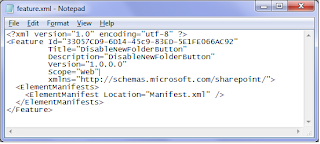
  • Edit feature.xml file in notepad and add the following code


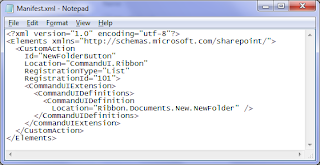
  • Edit Manifest.xml file in notepad and add the following code.


DisableNewFolderButton Feature has been created.


2) Install a Feature

  • We need to install this feature in SharePoint 2010.
  • Copy the folder DisableNewFolderButton to SharePoint 14 hive feature folder. (C:\Program Files\Common Files\Microsoft Shared\Web Server Extensions\14\TEMPLATE\FEATURES\).
  • Open stsadm tool as Administrator and exceute the following command. stsadm -o installfeature -name DisableNewFolderButton. Feature will be installed after running this command.

3) Activate a Feature

  • Feature has been installed now we want to activate the feature on a site.
  • Open stsadm tool as Administrator and exceute the following command. stsadm -o activatefeature -name DisableNewFolderButton -Url http://yoursiteurl/

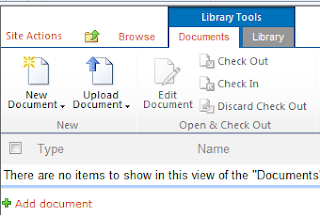
Now you go to the document library in the site, you will see New Folder is not visible as shown in the image.


If you want to make New Folder visible for a particular site, go to Site Actions --> Site Settings --> Manage Site Features. You can see your feature Active as show in the image.


Deactive the feature, New Folder will be visible in the document libraries of that site.

Thanks,

JK